Thursday, June 29, 2017

Krafty Guest Contest - Kraftin' Kimmie Stamps

Hello Everyone!
I'm going to be really honest here... I've been very apprehensive about submitting for the Krafty Guest Contest over at Kraftin' Kimmie Stamps.  Mostly because I was feeling I could not compete with the AMAZING things I see by their design team.  However... :) I have decided to GO FOR IT!

I actually designed 3 cards and then chose two of them for the contest but I will share all of them here.  I'm really excited about this opportunity, please leave a comment and let me know what you think.

Here we go...
Card #1: "Cow's it going?"
I stamped the images and colored them with Copic markers.  I used a blue card base  and the background was done with Tim Holtz Distress Oxides on watercolor paper... I just love those Oxides, they are AMAZING! I die cut the sun and little clouds and positioned them with the fussy cut images and popped up the puppy & cloud to complete the scene. Lastly I added some glossy accents to the milk bottle (unfortunately it's difficult to see in the picture).

I used the following stamp from Kraftin' Kimmie Stamps:

Here's Card #2: "Rocker Chick"
I stamped the Rocker Chick and colored her with Copic markers.  I chose a black card base and added a background created with Tim Holtz Distress Oxide inks on watercolor paper. I die cut the motorcycle on marble black card stock.  I also used glitter paste on watercolor paper (a mixture of pink/purple/gold) and then used a die cut to cut out the wings, as I wanted them to sparkle. Next I added the motorcycle to the background, added the wings to the Rocker Chic and then popped her up so that she would stand out from the background.  Lastly, I stamped the sentiment.

I used the following RETIRED stamp from Kraftin' Kimmie Stamps:

Here's Card #3: "Sandy Seawater"
I stamped the images and colored them with Copic markers.  I used a blue card base  and the background was done with Tim Holtz Distress Oxides on watercolor paper. I selected a taupe card base, added the background and then placed the trimmed colored image on top.  Lastly, I added some Nuvo drops (morning dew) for bubbles to finish it up.

I used the following stamp from Kraftin' Kimmie Stamps:

Thanks so much for taking the time to visit today :)
If you like these stamp sets as much as I do, you can get them and many others that are just as awesome HERE

Sandy "Copic Diva" Le Doux


Patriotic Gertie, Sweep this & Housework Sucks :)

Hello.... Hello....
I've been busy designing and today I have 3 cards to share with you.
I hope you like them, here we go:

First one: Patriotic Gertie
I chose this image/sentiment in light of the upcoming 4th of July holiday (and because my son is in the US Air Force).  I printed it on Xpress-it paper and then colored it up with Copic markers.  I chose a navy blue card base, added a piece of red card stock to tie in red/white & blue.  Next I added the colored image and sentiment, then finished it up with some little blue stars.

Here are the Imagine That Digistamp sets I used:

Patriotic Gertie         (sentiments from) Soldier Sam 
     

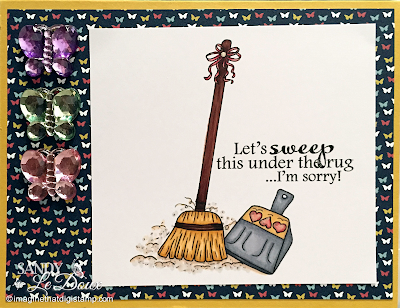
Second one: Sweep this...
I started with printing the image/sentiment on Xpress-it paper and then coloring it up with Copic markers.  I chose a mustard yellow card base and added some Stampin' Up design series paper.  Then I added the colored image and some jewel butterflies to bling it up a bit :)

Here is the Imagine That Digistamp set I used:


Third one: Housework Sucks
I started by printing the image/sentiment on Xpress-it paper and coloring it up with Copic markers... doesn't that sentiment make you giggle just a little? :)
Next I chose a light green card base and added some gold glitter paper.  Then I added the colored image and a metal flower for just a bit of bling.

Here is the Imagine That Digistamp set I used:


So... what did you think? They were so much fun to design, I just love my Imagine That Digistamp sets!  If you would like to own any of these just click on the name above the set image or to see other digistamp sets visit the shop HERE

Thanks so much for stopping by!

Sandy "Copic Diva" Le Doux


Thursday, June 22, 2017

Bee Boy & Skipper's Pocket

Hello... thanks so much for stopping by :)
Today I have two card designs to share, here is the first one:
Bee Boy
I started by printing the images on Xpress-it paper and then colored them with copic markers.  Next I chose a yellow card base, added some patterned paper and then put the colored image on top.  I added the honeycomb and bee die cuts with some dandelion yellow Nuvo crystal drops to give the bees dimension.  Lastly I added some Wink of Stella (clear) to the bee & boy wings.

Here is the Imagine That Digistamp set I used: 


My second card design is: Skipper's Pocket
I started by printing the images on Xpress-it paper and then colored them with copic markers.  Next I chose a green card base and added purple patterned paper.  I fussy cut the frog in the pocket and then popped it up on top of the patterned paper.  I added the sentiment and then pink bling from Queen & Co. on the sentiment and the flower centers to finish it up.

Here are the Imagine That Digistamp sets I used:

      Skipper's Pocket           (sentiment from) Kimmie's Sour Lemons
    
                   
(Hi there! from) Otter Say Hello

I just love to play with my Imagine That Digistamp sets... you should totally play too!
If you don't have any sets yet, visit the shop HERE
There are freebies you can try first if you'd like or if you like one that I used just click on the name above the digistamp image :)  
Thanks again for visiting!!

Sandy "Copic Diva" Le Doux

Saturday, June 17, 2017

Giraffe with Coffee

Hello Everyone....
Have you seen the new Imagine That Digistamp???
It's so adorable... check it out....

"It's been too looong!"
I started by printing the Giraffe & sentiment on Xpress-it paper, then I colored it with Copic Markers. I created the leafy background with Nuvo mousse and a stencil on watercolor paper.  I chose a tan card base and added the leafy background, then I fussy cut the Giraffe & sentiment.  When I assembled it together, I popped up the Giraffe so he would stand out from the background :)

Here is the new Imagine That Digistamp set I used:


So what do you think?  Are you loving it as much as I am?!  If so, just click the name above the digistamp set image and visit the shop :)

Thanks for stopping by!

Sandy "Copic Diva" Le Doux

Thursday, June 15, 2017

Girls Night In & Grand Slam

Hello Everyone!
I hope you're having a great week!
It's time for me to share 2 of my designs for this week... I hope you like them :)

First we have: Girls Night In 
I started this one by printing the image on Xpress-it paper and then colored with Copic Markers.  I chose a dark blue card base and added a strip of pink with white dots design paper. Next I added the colored image and to finish it up, added 4 little sparkly dots of bling from Queen & Company.

Here is the Imagine That Digistamp set I used:


And second we have: Grand Slam
I started off by printing the image/sentiment on Xpress-it paper and colored with Copic markers.  To create the card design, I chose a taupe card base and added a strip of printed paper at the bottom.  Then I aded the colored image and some 3D baseballs to finish it up.

Here are the Imagine That Digistamp sets I used:

            Baseball Boy                  Baseball/Softball Sentiments
   

Well... what do you think?  you like?
If you'd like to get any of these digistamp sets, just click on the name above the digistamp set image.  If you have any questions or would like to leave a comment, I'd love to hear from you :)

Thanks for visiting!

Sandy "Copic Diva" Le Doux

Thursday, June 8, 2017

Retro Waitress & Farmer Lily

Hello Ya'll!
I have a couple cards to share with you today... I hope you enjoy them as much as I did creating them.

Retro Waitress Card
I started by printing the image/sentiment on Xpress-it paper and then coloring it up with Copic Markers. I chose a bright blue card base and added red, yellow & blue washi tape from Queen & Co.  Next I added the colored image and some heart bling to finish it up.

Here is the Imagine That Digistamp set I used:


And for my second card today, we have:

Just Chicken in on you
I also started this one by choosing and printing the image/sentiment on Xpress-it paper and then coloring it with Copic Markers.  I double matted the colored image first on a background I created using Tim Holtz Oxide inks and then onto a wood patterned paper. Lastly, I added it to a light yellow card base and finished it up with a two little bling buttons.

I used the following Imagine That Digistamp set:


Thanks so much for visiting and please stop by again soon :)
Sandy "Copic Diva" Le Doux

Thursday, June 1, 2017

Graduation Cards

Hi Friends!
It's that time of year for Graduations so I've designed the following two cards using the Graduation Imagine That Digistamp set, I hope you like them :)

Dream, Believe, Achieve

I printed this image on Xpress-it paper and used copic markers to color.  Then I mounted the colored image on gold sparkle paper and attached to a blue card base. To finish it up, I added a graduation cap & star sticker.

Congrats Grad
First I printed this image on Xpress-it paper and then colored with copic markers, next I fussy cut the image and mounted it on black paper.  I took the red card base and trimmed the front piece 1/4 of an inch and added bling along the bottom of the card base.  Lastly I assembled the card and added a graduation cap & a star sticker.

Here are the Imagine That Digistamp sets I used:

Graduation Day 1                        Graduation Day 2
     

Thanks for stopping by... feel free to ask any questions or leave a comment and let me know what you think.  Have a great week!

Sandy "Copic Diva" Le Doux